
This guide walks through how to significantly improve network performance on a Raspberry Pi 5 using a USB‑C 2.5GbE adapter (such as the USBC‑E2500), especially when paired with a Raspberry Pi Compute Module 4 running OpenWRT as your router. The steps below are designed for users running Docker, NetBox, and NAS workloads who want the fastest and most stable networking possible without using PCIe expansion.
Overview
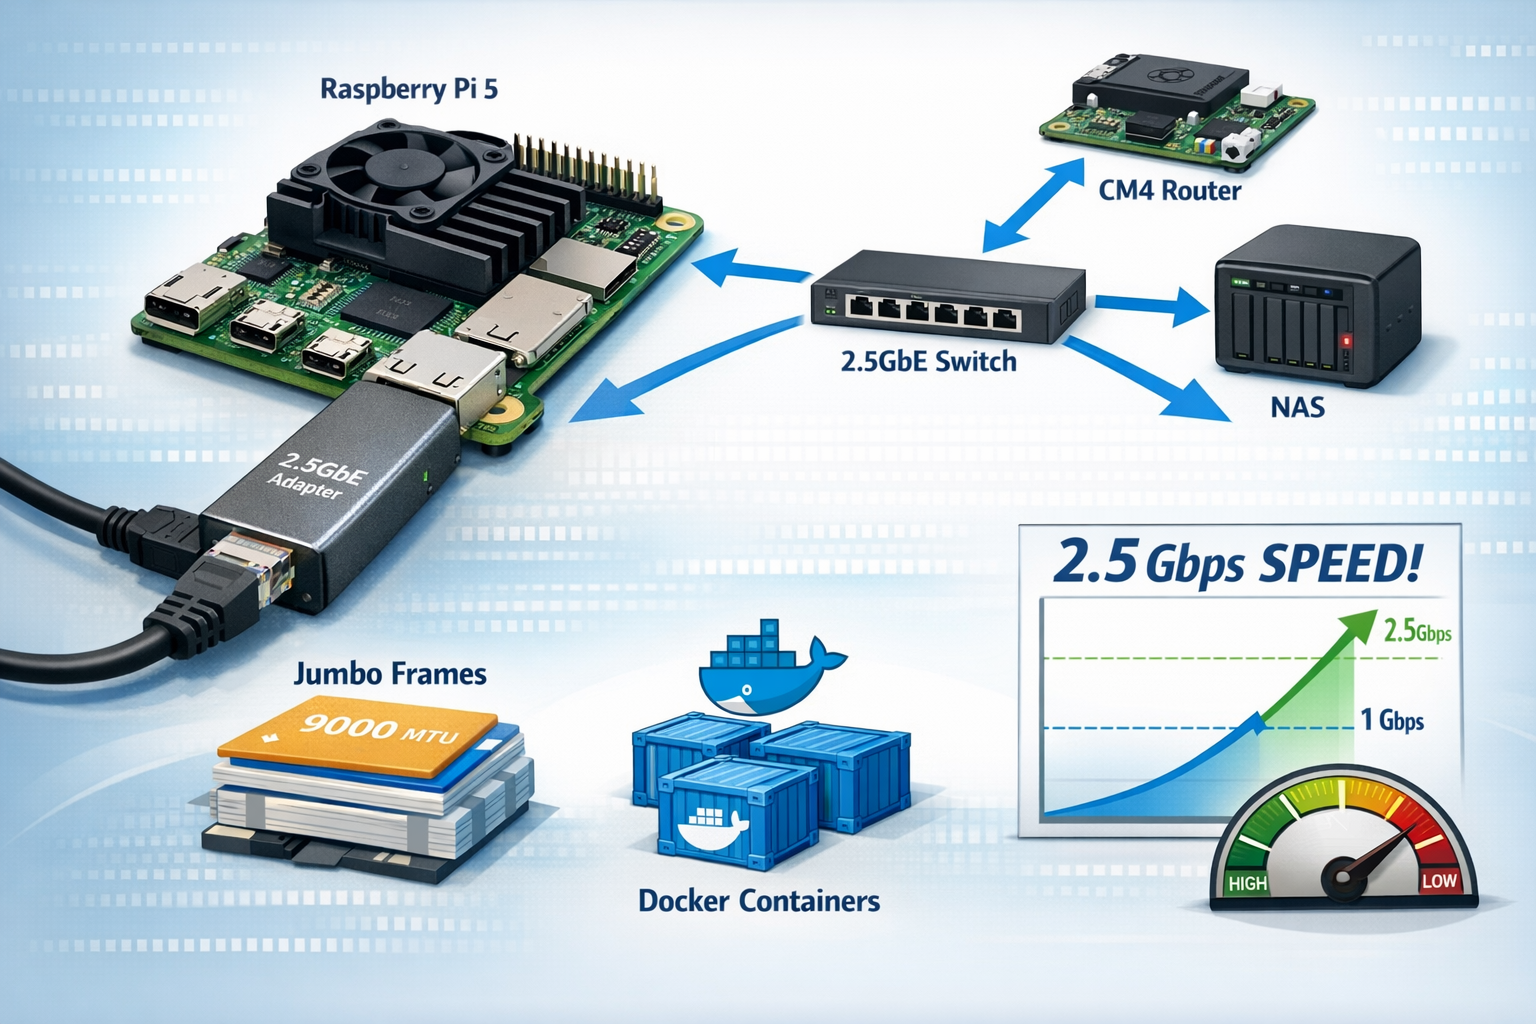
A Raspberry Pi 5 paired with a high‑quality USB‑C 2.5GbE NIC can deliver more than double the throughput of its built‑in Gigabit Ethernet port. When combined with proper network topology, jumbo frames, NFS, and Docker network tuning, the Pi 5 becomes a highly capable home‑lab server for container workloads and storage tasks.
This page covers:
- Using the USB‑C 2.5GbE NIC as the primary interface
- Optimizing a CM4 OpenWRT router for maximum throughput
- Designing a LAN topology that avoids bottlenecks
- Enabling jumbo frames for higher sustained transfer speeds
- Improving NAS performance with NFS
- Tuning Docker networking for high‑traffic containers
- Applying TCP buffer optimizations
- Ensuring thermal stability under load
1. Use the USB‑C 2.5GbE NIC as the Primary Interface
The Raspberry Pi 5’s built‑in Gigabit Ethernet is solid, but a USB‑C 2.5GbE adapter based on the Realtek RTL8156B chipset provides higher throughput and lower latency.
Steps
- Connect the NIC to the Pi 5’s USB‑C port.
- Disable energy‑efficient Ethernet and certain offloading features:
note: Your Nic will not be the same name as mine (eth1 is mine) Please put your Nic there. In a terminal type ip a.
sudo ethtool --set-eee eth1 eee offsudo ethtool -K eth1 gso off gro off tso off
- Make these settings persistent using a startup script or systemd service.
Expected Performance
- 2.35–2.45 Gbps with iperf3
- 1.8–2.3 Gbps sustained NFS transfers
- 1.2–1.6 Gbps SMB transfers
2. Optimize the CM4 Router Running OpenWRT
The CM4’s Ethernet interface is limited to 1 Gbps, but OpenWRT provides tools to maximize routing performance.
Recommended Settings
- Enable software flow offloading in the firewall settings.
- Install and enable
irqbalanceto distribute interrupt load:
opkg updateopkg install irqbalance/etc/init.d/irqbalance enable/etc/init.d/irqbalance start
These changes help maintain stable throughput under heavy LAN and WAN traffic.
3. Use a LAN Topology That Avoids Router Bottlenecks
Because the CM4 router is limited to 1 Gbps, the best approach is to place high‑bandwidth devices on the same switch.
Recommended Layout
- Pi 5 → 2.5GbE switch
- NAS → 2.5GbE switch
- CM4 router → 1GbE uplink to the same switch
Benefits
- Pi 5 ↔ NAS traffic runs at full 2.5GbE
- Only WAN traffic passes through the CM4
- Docker, NetBox, and NAS workloads operate without router bottlenecks
4. Enable Jumbo Frames (MTU 9000)
If your switch and NAS support jumbo frames, enabling MTU 9000 can significantly improve throughput.
On the Pi 5
sudo ip link set eth1 mtu 9000On the NAS
Set MTU 9000 in its network configuration.
On the Switch
Enable jumbo frames in the management interface.
Benefits
- Higher sustained transfer speeds
- Lower CPU usage
- Faster Docker registry pulls
5. Use NFS for NAS Workloads
SMB is CPU‑intensive on ARM devices. NFS provides much better performance for large file transfers and Docker volumes.
Example Mount
sudo mount -t nfs -o nfsvers=4 192.168.20.10:/mnt/storage /mnt/nfsExpected Performance
- 1.8–2.3 Gbps sustained
6. Optimize Docker Networking
Docker’s default bridge network can become a bottleneck for high‑traffic containers.
Use macvlan for High‑Throughput Containers
docker network create -d macvlan \--subnet=192.168.20.0/24 \--gateway=192.168.20.1 \-o parent=eth1 macvlan20
Use this network for:
- NAS‑related containers
- Media servers
- Reverse proxies
- High‑traffic APIs
Keep Internal Services on Bridge Networks
NetBox, Postgres, and Redis do not require direct LAN access and perform well on Docker’s internal bridge.
7. Tune TCP Buffers on the Pi 5
Adjusting TCP buffer sizes improves performance for large transfers and container operations.
Add to /etc/sysctl.conf:
net.core.rmem_max = 2500000net.core.wmem_max = 2500000net.ipv4.tcp_rmem = 4096 87380 2500000net.ipv4.tcp_wmem = 4096 65536 2500000net.ipv4.tcp_window_scaling = 1
Apply the Changes
sudo sysctl -p8. Ensure Proper Cooling
The Raspberry Pi 5 can throttle under sustained 2.5GbE load. Adequate cooling ensures stable performance.
Recommended Cooling
- Official Raspberry Pi active cooler
- A case with a dedicated 5V fan
9. Benchmark Your Network
Use iperf3 to verify improvements.
On the NAS
iperf3 -sOn the Pi 5
iperf3 -c <NAS-IP> -P 4Expected Results
- 2.3–2.45 Gbps Pi 5 → NAS
- 1.8–2.3 Gbps sustained NFS transfers
- 1.2–1.6 Gbps SMB transfers
Conclusion
By combining a USB‑C 2.5GbE NIC with proper network topology, jumbo frames, NFS, Docker tuning, and system‑level optimizations, the Raspberry Pi 5 becomes a powerful and efficient server for home‑lab environments. These improvements deliver faster transfers, lower latency, and more stable performance for workloads such as NetBox, Docker containers, and NAS operations.
This configuration offers an excellent balance of performance and practicality without requiring PCIe expansion, making it ideal for compact and energy‑efficient setups.
Just be transparent about this: I wrote this article and I had AI format it for me. I feel like that is kinda cheating but not really. I was definitely not an English or spelling major in college so, I need help with that type of thing.
By the way I have 3 Multigig Switches in my network. This article just depicts one multigig switch.
Hopefully this helped you understand this topic.
Thank you again for stopping by.