
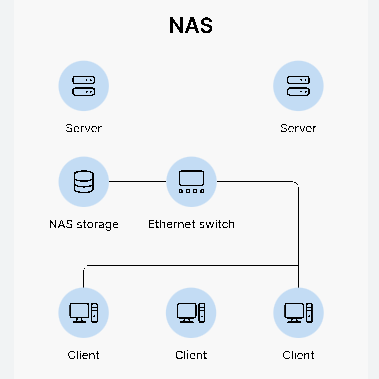
So you want to use your SBC/Pi as a NAS and you have no clue how to start or where to start. Well I believe I have a solution for using common ordinary software from the OpenSource community. With this setup you should be able to share files to your network/HomeLAB or whatver the case may be. Using RAID via MDADM/iSCSI, NFS, SMB/CIFS We try to get you to a point where you do not need anything but your own time. This is a reliable and stable Open Source technology readily available to you on the internet. You can also follow this article if you like: it is slightly different than this current article: Build a NAS.
Let’s Get started:
Prerequisites:
- a SBC Device or a VM on Proxmox
- an OS (I personally use Ubuntu Server) You can use what you like.
- 2 – 5 hard drives to configure for your NAS – have an external power source for the drives. I use a sata to usb converter w/power.
- iSCSI, nfs-kernel-server, nfs-common, Samba-Cifs, mdadm
- Latest version of Webmin – The link is provided in the article.
- at least one Nic – 2 Nics would be ideal for the second Nic I use this. There are cheaper ones but they are 1gb.
- last but not least about 30 minutes of your time.
1 – Burn the OS to a SD Card/nVME/eMMC – OPi5Plus method of burning OS
2 – ssh into the device/vm ex: ssh username@ip_address
3 – sudo nano -c /etc/hosts
put your ip and fqdn in this file:127.0.1.1 OPi5Plus.pihobby.loc OPi5Plus
192.168.190.100 OPi5Plus.pihobby.loc OPi5Plus
4 – cat /etc/hostname – make sure your hostname is properly entered here.
note: Update repo and OS packages.
5 – sudo apt update && sudo apt -y full-upgrade
6 – sudo apt -y install tgt samba nfs-kernel-server mdadm rsync dump nfs-common
note: Let’s check to see what we are working with.
7 – sudo lsblk
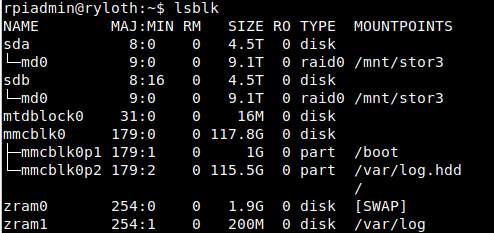
note: Notice the extra drives sda & sdb
Create the RAID array:
note: Use double dashes (- -) in the command in the next line please. I like to use all my space so I use raid 0.
8 – sudo mdadm –create –verbose /dev/md0 –level=0 –raid-devices=2 /dev/sda /dev/sdb
Let’s make sure it was created properly
9 – cat /proc/mdstat
Look at the md0 line it will tell what devices are part of the raid array.

Create the filesystem on the raid
10 – sudo mkfs.ext4 /dev/md0
Create the mount point
11 – sudo mkdir -p /mnt/name-of-share – ex: /mnt/stor1 or /mnt/nas1
mount the raid device
12 – sudo mount /dev/md0 /mnt/nas1
Let’s append the config to the mdadm config file
13 – sudo mdadm –detail –scan –verbose | sudo tee -a /etc/mdadm/mdadm.conf
Let’s enable the raid at boot now.
14 – sudo update-initramfs -u
Put the raid mount point in the fstab file, this is so you can mount it at boot time.
15 – sudo nano -c /etc/fstab
/dev/md0 /media/Stor1 ext4 defaults,nofail,discard 0 0
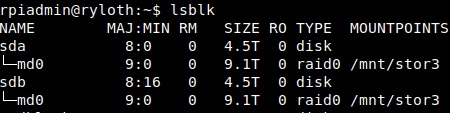
Test the raid to make sure it’s functioning properly, look at the mount points
16 – lsblk
set your permissions to the share
17 – sudo chmod -Rf 777 /mnt/nas1/
The below allows you to have anonymous access the share, you don’t want root as the owner here.
18 – sudo chown -R nobody:nogroup /mnt/nas1
I always set the timezone after the config is complete.
19 – sudo timedatectl set-timezone America/New_York – mine is the United States / EST
If you want to install a new GUI: (Follow the instructions starting at line 15 in this article).
If you need assistance send me an email to: support@pihobby.org, I will do my best to get you up and running. Thank you for stopping by and reading my article.