

Wazuh is a free and open source security platform that unifies XDR and SIEM protection for endpoints and cloud workloads. I discovered this by accident through an online friend. This is a great open source product with no I gotchya’s. You install the server and then add each agent as you go. In this article I will walk you through the install of both the server and agent.
We always look for ways to keep the Black Hats at bay, this just may be the ticket.
Installing Wazuh on a Raspberry Pi 4B involves several steps, including setting up the Raspberry Pi, installing the necessary dependencies, and then installing Wazuh.
Here’s a step-by-step guide to help you through the process:
1. Prepare the Raspberry Pi
Install Raspbian OS:
Download the latest Raspbian OS from the official Raspberry Pi website.
Use a tool like balenaEtcher to write the Raspbian OS image to your microSD card.
Insert the microSD card into your Raspberry Pi and power it on.
Follow the on-screen instructions to complete the initial setup.
Update the system: Open a terminal and run the following commands to update the system packages:
1 – sudo apt-get update
2 – sudo apt-get upgrade
Install Dependencies:
Wazuh has several dependencies that need to be installed first. Run the following commands:
3 – sudo apt-get install curl apt-transport-https lsb-release gnupg
Install Wazuh Repository and GPG Key
Add the Wazuh repository and the GPG key for package verification:
4 – curl -s https://packages.wazuh.com/key/GPG-KEY-WAZUH | sudo apt-key add –
5 – echo “deb https://packages.wazuh.com/4.x/apt/ stable main” | sudo tee /etc/apt/sources.list.d/wazuh.list
Install Wazuh Manager
Update the package list and install the Wazuh Manager:
6 – sudo apt update
7 – sudo apt -y install wazuh-manager
Configure Wazuh Manager
After installation, you need to configure the Wazuh Manager. The main configuration file is located at /var/ossec/etc/ossec.conf. You can edit this file to suit your requirements.
8 – sudo nano -c /var/ossec/etc/ossec.conf
Start Wazuh Manager
Start the Wazuh Manager service:
9 – sudo systemctl start wazuh-manager
10 – sudo systemctl enable wazuh-manager
11- sudo systemctl status wazuh-manager – Look for active: running
Install Wazuh Agent (Optional)
If you also want to monitor the Raspberry Pi itself using Wazuh Agent:
12 – sudo apt-get install wazuh-agent
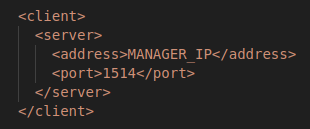
Configure the agent by editing the /var/ossec/etc/ossec.conf file and set the manager’s IP address:
13 – sudo nano -c /var/ossec/etc/ossec.conf
Add the manager’s IP address in the <address> tag within the <client> section:
Start and enable the Wazuh Agent:
14 – sudo systemctl start wazuh-agent
15 – sudo systemctl enable wazuh-agent
Verify Installation
To ensure everything is running correctly, you can check the status of the Wazuh Manager and Agent:
16 – sudo systemctl status wazuh-manager
17 – sudo systemctl status wazuh-agent
You can also check the Wazuh logs for any errors:
18 – sudo tail -f /var/ossec/logs/ossec.log
Additional Steps: Web Interface
If you want to manage Wazuh through a web interface, you need to install Wazuh
Kibana and Elasticsearch on a separate machine or the same Raspberry Pi if
resources allow. Refer to the official Wazuh documentation for detailed instructions
on setting up the Elastic Stack with Wazuh.
Conclusion
Your Wazuh Manager should now be up and running on your Raspberry Pi 4B.
This setup allows you to monitor and manage security events efficiently.
Make sure to regularly check for updates and maintain your system for optimal
performance and security.
Just a word of caution, This took me like 5 to 6 tries before I got it to work on the SBC (ARM) devices. It worked fine in Proxmox (Intel/AMD) on a VM. Let me know if this works for you. Thank you for dropping by.