Time: 60 minutes
Kubernetes is difficult to setup, configure, and use. It is an orchestration and container technology which allows you to use microservices in the enterprise. However you can make use of it in your homelab as well. You learn at your own pace and get things working the way you want them to work. There are several videos on youtube that will show you how to use Kubernetes with the multiple different flavors of it such as , K3s, K8s, MicroK8s (This is the easiest way to deploy Kubernetes in my humble opinion). I do this on RPiOS (Raspberry Pi OS). Use which ever one ya like.
Let’s get started:
1 – Install the OS of your choice.
note: Let’s prepare the OS for use with Microk8s
2 – sudo apt update && sudo apt -y full-upgrade
note: If the above gives an error with oldstable in it run the following: If there is no error then skip this.
sudo apt update –allow-releaseinfo-change
note: Let’s prepare the pi for MicroK8s
3 – sudo swapoff -a
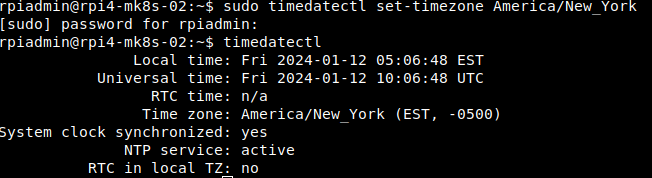
4 – sudo timedatectl set-timezone America/New_York
timedatectl <enter>
5 – sudo nano -c /boot/firmware/cmdline.txt (Ubuntu Server 2x.xx) on a Raspberry Pi 4 – sudo nano -c /boot/cmdline.txtcgroup_enable=cpuset cgroup_enable=memory cgroup_memory=1 swapaccount=1
ip=your_ip_here::gateway_here:255.255.255.0:rpi4-pimox-01:eth0:off

The next thing is you shouldn’t need sound wifi or bluetooth on a server so let’s disable them.
6 - sudo nano -c /boot/firmware/config.txt (Ubuntu Server 2x.xx) on a Raspberry Pi 4 - sudo nano -c /boot/config.txt
dtoverlay=disable-wifi
dtoverlay=disable-bt

dtparam=audio=on
dtparam=audio=off

7 - sudo apt -y install tgt samba nfs-kernel-server mdadm rsync dump

Now let's install Microk8s:
8 - sudo apt -y install snapd
9 - sudo snap install core
10 - sudo reboot
11 – sudo snap install microk8s --classic --channel=1.28/stable
note: If you are running a firewall locally run the following: otherwise skip this step. You can remove the firewall like this: sudo systemctl stop ufw / sudo systemctl disable ufw
12 – sudo ufw allow in on cni0 && sudo ufw allow out on cni0
13 – sudo ufw default allow routed
note: Let’s enable some modules, We will add Persistent storage (NFS) Later in the tutorial.
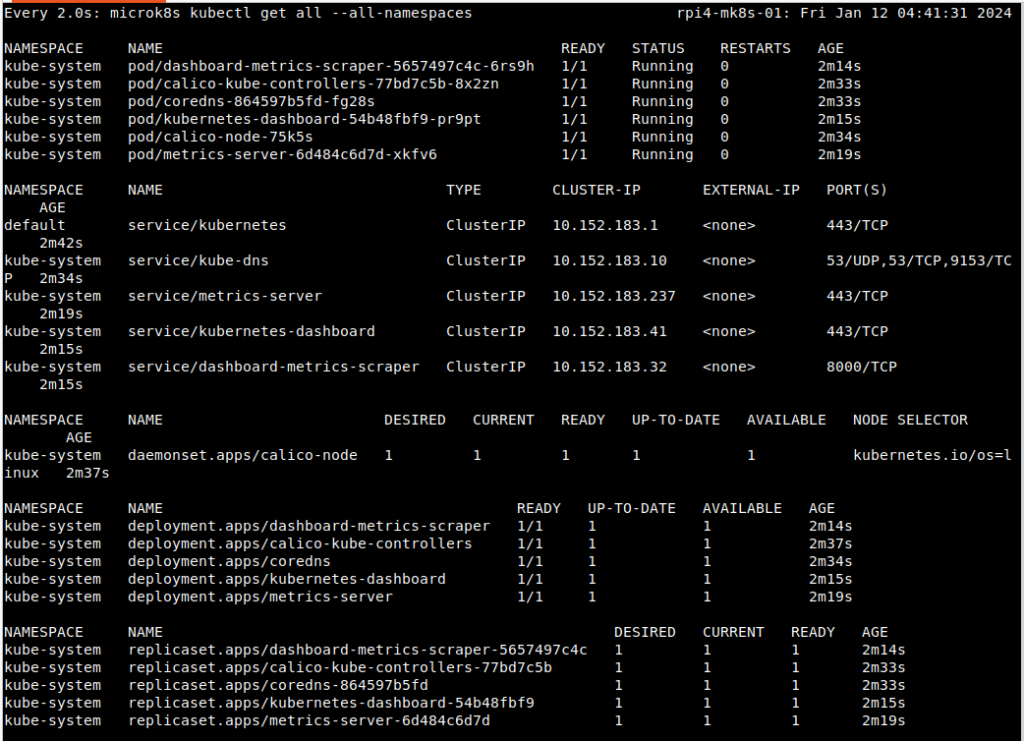
Let’s check the progress of our PODs, ctrl-c will exit out of this for you.
14 – sudo watch microk8s kubectl get all --all-namespaces
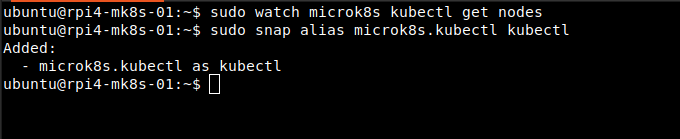
Let’s make an alias for kubectl so we can run kubernetes with our logged in user.
15 – sudo snap alias microk8s.kubectl kubectl
Now we have to add the user to the proper group and create a workspace for it. Let’s create the workspace for this user.
16 – sudo usermod -aG microk8s $USER
17 – sudo mkdir ~/.kube
Let’s give this user the proper permissions.
18 – sudo chown -f -R $USER ~/.kube
19 – newgrp microk8s
note: Let’s install some modules we are going to need.
20 – sudo microk8s enable dns dashboard community helm
Let’s Setup the Dynamic Persistent Storage previously mentioned.
21 – sudo microk8s helm repo add nfs-subdir-external-provisioner https://kubernetes-sigs.github.io/nfs-subdir-external-provisioner/
22 – microk8s helm repo update
23 – sudo microk8s helm install nfs-subdir-external-provisioner nfs-subdir-external-provisioner/nfs-subdir-external-provisioner \
–set nfs.server=x.x.x.x \
–set nfs.path=/exported/path
Make this your default storage remember it is dynamic so every application you deploy will be stored here.
24 – microk8s kubectl get sc
note: Turn default hostpath storage off.
25 – microk8s kubectl patch storageclass microk8s-hostpath -p ‘{“metadata”: {“annotations”:{“storageclass.kubernetes.io/is-default-class”:”false”}}}’
note: Turn on the new shared storage as the default hostpath.
26 – microk8s kubectl patch storageclass nfs-client -p ‘{“metadata”: {“annotations”:{“storageclass.kubernetes.io/is-default-class”:”true”}}}’
Let’s configure the IPs of our Controller and Worker Nodes.
27 – sudo hostnamectl set-hostname
28 – sudo nano /etc/hosts192.168.4.10 mk8smgr
192.168.4.11 mk8snode1
192.168.4.12 mk8snode2
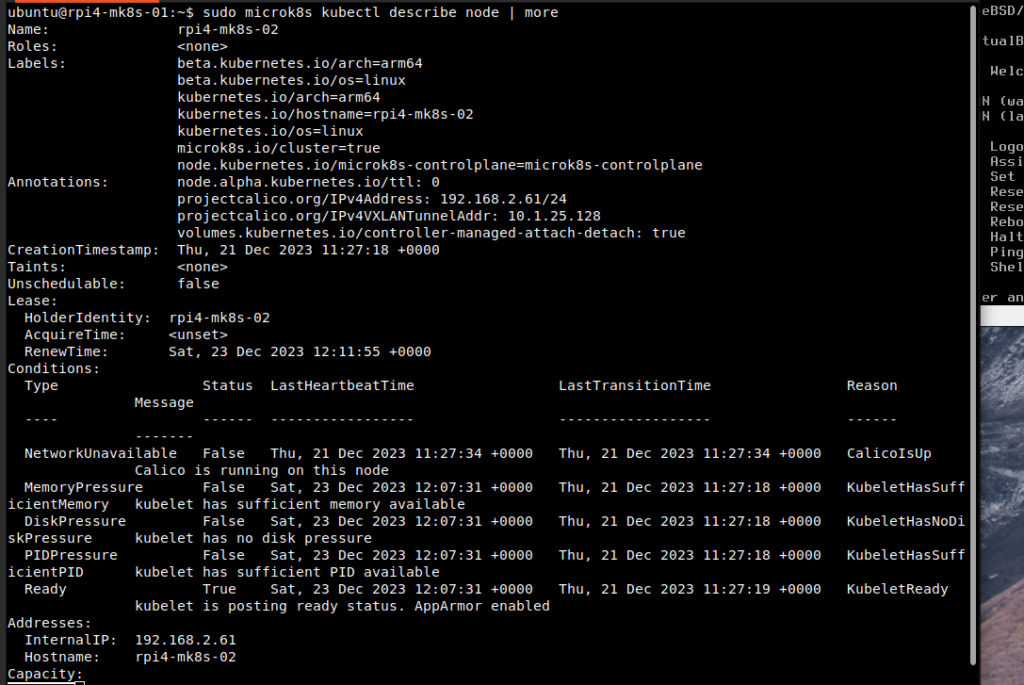
Let’s check the node to make sure it’s properly installed.
29 – sudo microk8s kubectl describe node
At this point we should have the Master/Controller node completed.
Worker node setup for a Cluster configuration.
Do these steps for every worker node:
1 – Install the OS of your choice.
note: Let’s prepare the OS for use with Microk8s
2 – sudo apt update && sudo apt -y full-upgrade
note: If the above gives an error with oldstable in it run the following: If there is no error then skip this.
sudo apt update –allow-releaseinfo-change
note: Let’s prepare the pi for MicroK8s
3 – sudo nano -c /boot/firmware/cmdline.txt (Ubuntu Server 2x.xx) on a Raspberry Pi 4 – sudo nano -c /boot/cmdline.txtcgroup_enable=cpuset cgroup_enable=memory cgroup_memory=1 swapaccount=1
ip=your_ip_here::gateway_here:255.255.255.0:rpi4-pimox-01:eth0:off

The next thing is you shouldn’t need sound wifi or bluetooth on a server so let’s disable them.
4 - sudo nano -c /boot/firmware/config.txt (Ubuntu Server 2x.xx) on a Raspberry Pi 4 - sudo nano -c /boot/config.txt
dtoverlay=disable-wifi
dtoverlay=disable-bt

dtparam=audio=on
dtparam=audio=off
Now let’s install Microk8s:
5 – sudo apt install snapd
6 – sudo snap install core
7 – sudo reboot
8 – sudo snap install microk8s –classic –channel=1.27/stable
note: If you are running a firewall locally run the following: otherwise skip this step.
9 – sudo ufw allow in on cni0 && sudo ufw allow out on cni0
10 – sudo ufw default allow routed
Now we have to add the user to the proper group and create a workspace for it. Let’s create the workspace for this user.
11 – sudo usermod -aG microk8s $USER
12 – sudo mkdir ~/.kube
Let’s give this user the proper permissions.
13 – sudo chown -f -R $USER ~/.kube
14 – newgrp microk8s
You have to go back to the Controller node for this next step:
15- sudo microk8s add-node
Now go back to the worked node you want to add:
16 – sudo microk8s join 192.168.1.137:25000/d6c656de35d466889c92cebcaca0d843/30b781bb37e8
The above is one line please be aware of that.
Now go back to the Controller node and run the following:
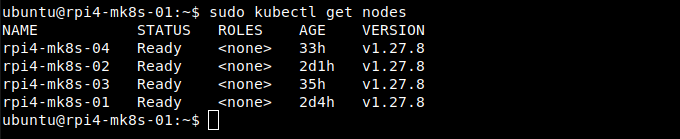
17 – sudo watch microk8s kubectl get nodes

At this point you have a working kubernetes cluster. Please be sure to use sudo microk8s then the command you want to run. I usually just create an alias for kubectl so that all you have to do is run one command.
Here is how to create the alias to just type kubectl as the command:
sudo snap alias microk8s.kubectl kubectl
example: sudo kubectl get nodes
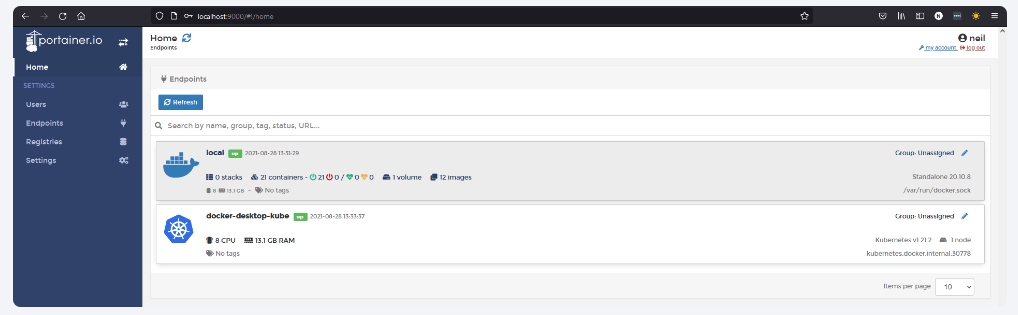
I use Portainer as my management GUI. Portainer actually allows you to manage both a Docker standalone/swarm (This link shows you how to install Portainer on Docker) and a kubernetes cluster in the same interface (Central management). There are Several videos on youtube to show you how to install Portainer on Docker and Kubernetes, This would be out of scope for this article.